
WALLSORPTION Installation Guide
Download this as a PDF file here
See our Install Video for Wallsorption above.
NOMINAL DIMENSIONS
Panel size: 2700 x 1200mm Panel thickness: 25mm Upvc fixing trims: 2700mm lengths
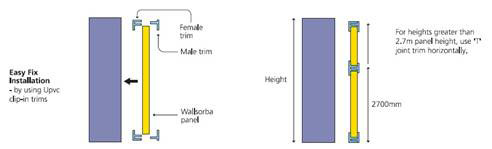
INSTALLATION
Use spirit level to align all horizontal and vertical surfaces. Drill oversized holes in Upvc female trims larger than screw shank, but smaller than screwhead. Use V line as guide. Screw fix at maximum of 400mm centres.
TYPE A INSTALLATION
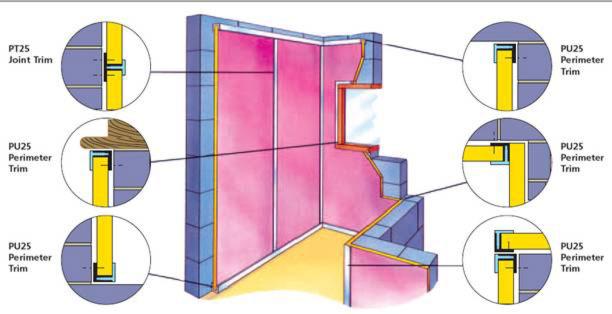
FIXING GUIDE
A. Screw fix Upvc female perimeter trim to top, bottom and end of walls.
B. Screw fix Upvc female ‘T’ joint. trim vertically between top and bottom Upvc female perimeter trims, allowing for Wallsorption panel width and height.
C. Cut and insert individual Wallsorption panels to fit between female perimeter and female ‘T’ joint trims. Push fit top and bottom male perimeter trims into female trims. Then neatly cut
vertical male perimeter and vertical male ‘T’ joint trims to fit between the top and bottom perimeter trims and push fit together. Make sure to place the ‘PULSTRIP™’ labeled end at top. Ensure that all trims are fully pushed in and located.
TYPE B INSTALLATION
NOMINAL DIMENSIONS
Panel size: 2700 x 1200mm Panel thickness: 25mm Upvc fixing trims: 2700mm lengths
INSTALLATION
Use spirit level to align all horizontal and vertical surfaces. Drill oversized holes in Upvc female trims larger than screw shank, but smaller than screwhead. Use V line as guide. Screw fix at maximum of 400mm centres.
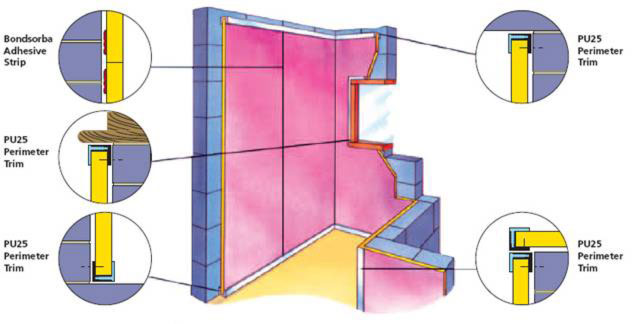
A. Screw fix Upvc female perimeter trim to top, bottom and end of walls.
B. Cut panels to size. Position individual Butt Joint Wallsorption panels to fit between the female perimeter trims. Ensure that the visible panel butt joints are tight and straight.
C. Remove panels away from wall and apply an even brush coat of our contact adhesive (approx 100mm wide x 150mm long strip) on the wall to coincide with the perimeter edge of the rear of the panels about half way down the panel height and allow to touch dry for about 15 minutes. Then apply a similar strip of contact adhesive on the corresponding positions on the back of the panels so they coincide with the glue positions on the wall. Allow to touch dry (10 – 15 minutes). Carefully reposition the panels in the original positions. The panels must be carefully repositioned as once contact is made with the adhesive then they cannot be readjusted.
D. Push fit top, bottom and end male perimeter trims into female trims. Ensure that all trims and panels are fully pushed in and located.
If paneling runs generally end to end in a corner of a room, the neatest method is as shown above.
Because no panel run has more than one cut edge at each end therefore all these are hidden in corners by the uncut panel. This eliminates the need for any internal corner trims hence resulting in a neater finish.
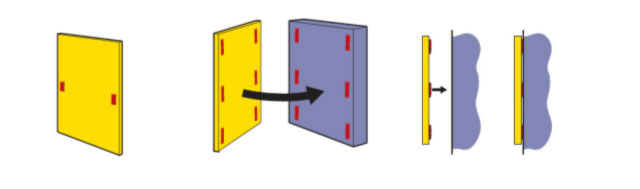
TYPE C INSTALLATION
NOMINAL DIMENSIONS
Standard sizes: 1200 x 1200mm, 1200 x 1500mm, 1200 x 1800mm,1200 x 2100mm, 1200 x 2400mm, 1200 x 2700mm
Panel thickness: 25mm
Custom size panels made to customers requirements are available. Please indicate sizes of width and height required. e.g. 1050mm wide x 1710mm high.
INSTALLATION TO WALLS
Panels are contact adhesive fixed to backing surface using our aerosol adhesive. This is a simple and strong adhesive system for bonding Wallsorption panels direct to walls. This method allows panels to be applied direct to concrete, brickwork, wood, plaster or metal as long as they are smooth. There is an immediate bond, therefore no mechanical support is required or the need for any drilling. A more detailed site installation guide is sent with each delivery.
SURFACE PREPARATION
The wall must be clean, dry and free from loose paint or plaster, dust etc. Wallpaper should be removed, gloss paint roughened and emulsion paint brushed with a stiff brush to ensure it is firm. Absorbent surfaces, if in doubt should be primed with a dilute solution of PVA adhesive at a mix of 5:1 and allowed to dry for at least 24 hours before applying the panel adhesive.
FIXING PANELS
Mark the position of the panels on the wall. Apply an even spray coat of our aerosol adhesive on over the entire area to be covered and on the rear of the panel in a cobweb type spray pattern. In ambient temperatures the panels can be applied straight away ensuring they are fully bonded over the entire surface as shown in our video at the top of this page. Carefully position the panel, fit one corner first, then align vertically and horizontally. Apply firm, even pressure over the entire panel with the flat of your hand. It is important the panels are carefully positioned as once contact is made they cannot be readjusted.
CLEANABILITY AND MAINTENANCE
The panels are designed for long term use in building environments with minimal maintenance. However, the panels can be vacuum cleaned periodically. Any slight dirt marks may be cleaned with a damp cloth or a proprietary cleaner but it is advised that a small section of the panel is tested first to ensure the chosen cleaner does not affect the colour of the product.
INSTALLATION TO CEILINGS
For ceilings, it is advised that Wallsorption should NEVER be adhered to a ceiling without using the correct adhesive. If the product is being fitted by non-experienced installers, it is advised the panels are also secured with additional mechanical fixings. If in doubt call our technical team on 0845 363 7131.
Every endeavour has been made to ensure that the information given herein is true and reliable but is given only for guidance. The company cannot accept any responsibility for loss or damage that may result from the use of the information, due to the possibility of variations of processing or working conditions and of workmanship outside our control. Users are advised to confirm the suitability by their own tests.

